MACCY-KON-TIKI CHARCOAL MAKER
by Brian Lewis - December 31st, 2016.Filed under: Articles.
Introduction:
The Kon-Tiki charcoal maker is a relatively new design of charcoal maker currently being adopted widely by the biochar fraternity. It is effectively an above ground open fire pit. The main advantages are simplicity of design, tolerance to shape and size of feedstock, and char volume potentially as large as the container volume itself.
The design of the Kon-Tiki is based on a truncated cone. Alternatively a truncated pyramid can be used. The following plans and parts list are based on the truncated pyramid version. This version has a capacity of 0.230 m³.
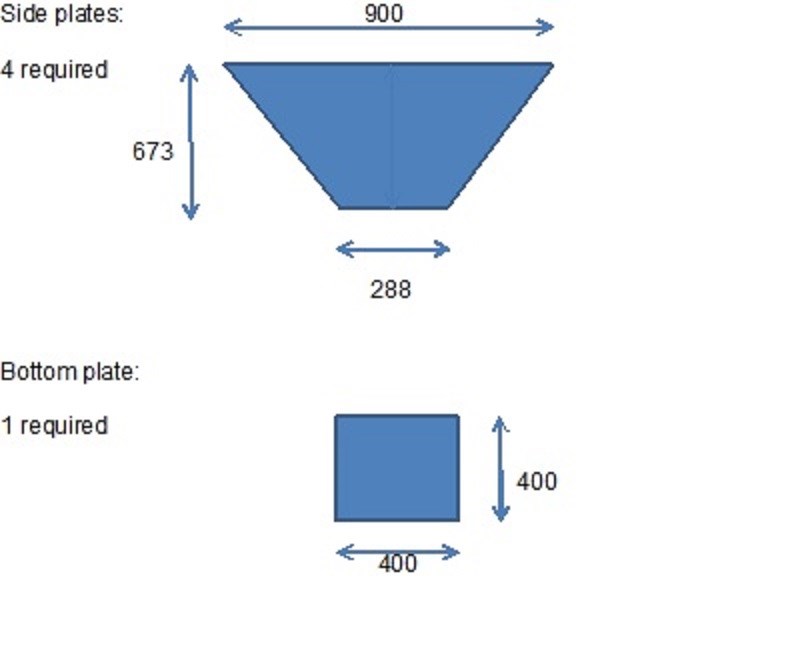
Assembly: Position all 4 side plates with 900 edge at ground level and lean in to form a truncated pyramid. Check that each top corner meets flush. Fully weld each side plate to its adjacent side plate. Position bottom plate and fully weld all around to the side plates.
Material thickness:
For economy and lightness a low gauge is desirable; but for durability a larger gauge is preferred. If a light gauge is used, say 1.8mm, then reinforcing rods welded to top and bottom edges would be recommended. These rods can be extended by 100mm at each side to provide lifting means.
For durability and ease of welding 3mm sheet steel is recommended.
Weight:
Based on 3mm sheet steel the approx. weight of the unit will be 35 kg.
Based on 1.8mm sheet steel the approx. weight of the unit will be 21kg.
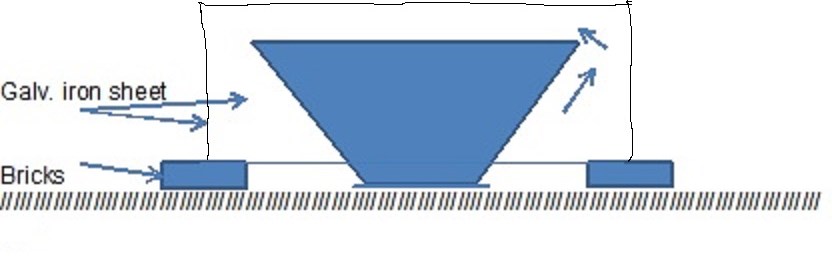
Rim shield:
In windy conditions it is desirable to use a rim shield. For a truncated pyramid the shield can be made from flat or corrugated sections of used roof or fencing iron placed on all 4 sides. Simply cut to height of unit (600mm) and stand on bricks or similar so that it projects about 100mm above the rim of the unit and about 100mm from edge. This will provide a route for the air to flow up the outside of the unit, be preheated on its way up along the outside and then spill over into the unit to provide an air vortex over and around the top of the flame-front.
Operation:
Start a small fire in the bottom of the empty unit by constructing a small heap of twigs criss-crossed to form a “chimney” with an air space up the centre. Air will be drawn down to the perimeter of the fire and into the flame area.
Feed larger twigs onto the fire so as to build it up in size.
Continue this process, pausing only if the wood starts to smoke.
Larger pieces can be added as the flame area becomes larger.
What happens is that while the first top layer of wood is burning the layer beneath is heated to the point that it releases its gas which is burnt off cleanly at the top of the wood layer. Air cannot penetrate down below the top layer so no combustion can occur there. Thus the layers are progressively pyrolysed (heated in the absence of oxygen) to produce char.
Continue until the unit is full of char and no more new wood can be added.
Quenching:
When the feedstock has all been converted to char the char itself will then start to burn unless it is thoroughly quenched with water. I recommend that water simply be hosed onto the surface of the char and the unit filled with water. Alternatively the hot char can be tipped out onto a flat non-combustible surface and hosed down thoroughly.
A drain hole in the centre of the base of the unit will allow the water to self-drain when a channel is dug in the ground from the outside to the middle. The drain hole must be air sealed during operation so the unit should be operated while sitting squarely on the ground.
Any questions, comments or helpful suggestions please let me know.
Brian Lewis
Convener
Adelaide Hills Biochar Initiative
www.ahbi-blog.com
www.facebook.com/adelaide-hills-biochar
Leave a Reply